Kids Cyanotype Sun Print Kit: Easy DIY Blueprints
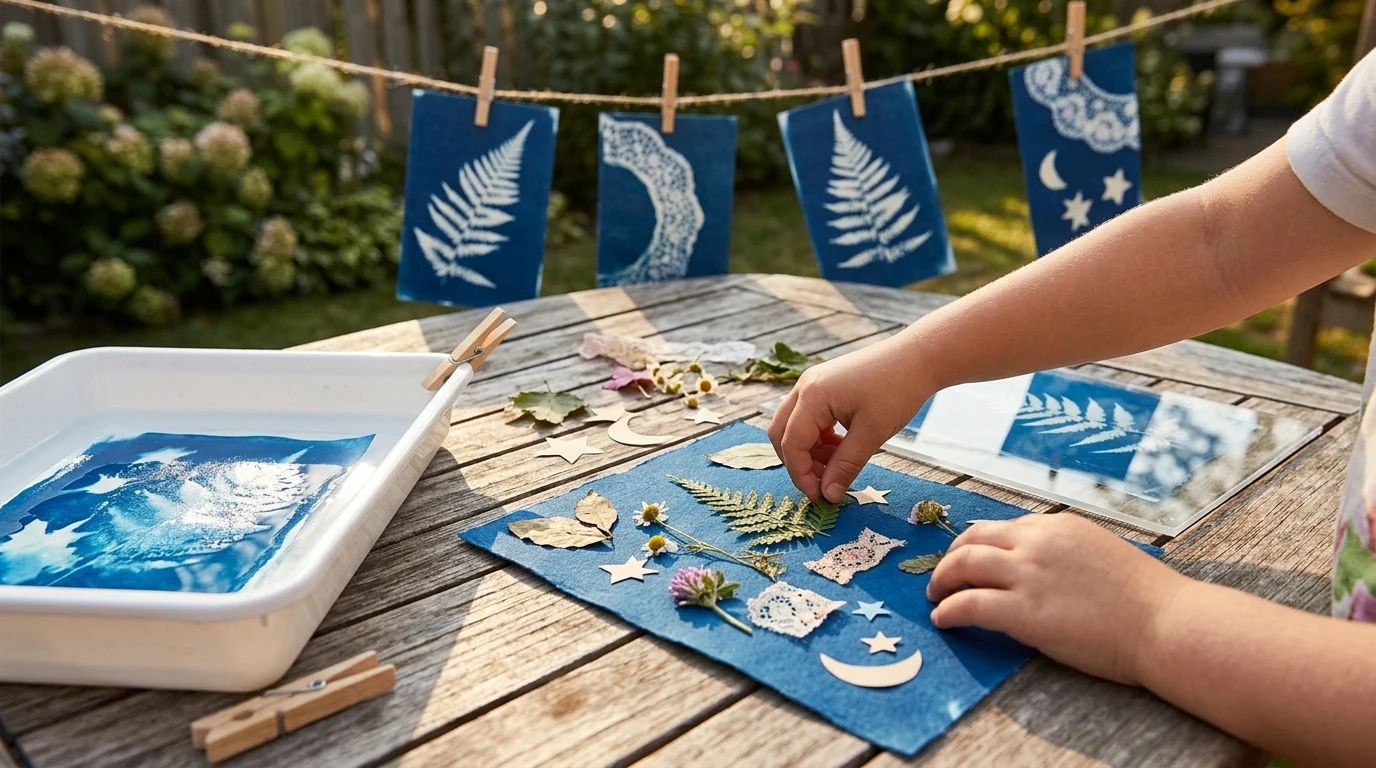
Kids DIY Cyanotype Art Paper Set – Creative Sun-Print Photography Kit
Cyanotype sun prints turn leaves, flowers, and everyday objects into bold blue silhouettes using sunlight and water. This kid-friendly craft makes it easy to explore photography basics, nature art, and hands-on creativity—without screens—while producing frame-worthy results in minutes.
Originally developed as a photographic printing process, cyanotype is best known for its unmistakable “blueprint” look (a quick background read: Encyclopaedia Britannica: Cyanotype). For kids, it feels like a science experiment that doubles as art: arrange, expose, rinse, and watch the image appear.
What cyanotype sun printing is (and why kids love it)
Cyanotype is a classic photographic printing process that creates deep blue images when treated paper is exposed to UV light. Instead of using a camera, kids create a “shadow photo” by placing objects directly on the paper—anything that blocks light becomes a lighter silhouette, while exposed areas shift into rich blues.
- Hands-on composition practice: arranging leaves, lace, or paper shapes teaches balance, spacing, and negative space.
- Fast feedback: after exposure and a water rinse, the image becomes visible and deepens as it dries.
- Easy to share: siblings, playdates, classrooms, and camps can all produce different results with the same setup.
- Flexible timing: you can prep indoors on a rainy day and expose when the sun returns.
For a bit of historical context and inspiration, browse cyanotype-related collection materials through the Royal Photographic Society.
What’s included and what to have on hand
Most kids cyanotype sets focus on the essentials: pre-coated cyanotype papers ready for sun printing (exact sheet counts vary by set). Because the magic happens through contact printing, a few household tools make results much sharper and less frustrating for first-timers.
Quick kit snapshot
| Item | Purpose | Kid-friendly tip |
|---|---|---|
| Cyanotype paper | Holds the light-sensitive coating that forms the image | Handle by the edges to avoid fingerprints |
| Flat backing (clipboard/board) | Keeps the layout steady outdoors | Clip the paper so it doesn’t flutter in wind |
| Clear cover (acrylic/glass) | Presses objects flat for sharper edges | Use acrylic for safer handling |
| Water rinse setup | Stops exposure and reveals the final blue | Use cool water; rinse until runoff is mostly clear |
| Objects to print (leaves, lace, stencils) | Creates the silhouette/negative space image | Try a “texture hunt” for different veins and patterns |
Helpful add-ons from home: painter’s tape (to hold corners), a tray or clean sink for rinsing, and a towel space or drying line so prints don’t pick up lint or smudges. Optional extras: lace scraps, stencils, transparent shapes, toy silhouettes, and cut-paper designs for storytelling scenes.
How to make a great first sun print (simple steps)
The first print sets the tone—keep it simple, use a flat leaf, and treat it like a mini experiment.
- Prep indoors: lay out materials away from direct sunlight and bright windows to avoid accidental exposure.
- Arrange: place cyanotype paper on a flat surface, add leaves/objects, and cover with clear acrylic so everything stays flush.
- Expose: take the “sandwich” into sun. Exposure time depends on brightness; if unsure, do a quick test strip (cover part of the paper and reveal it in stages).
- Rinse: remove objects and rinse in cool water until highlights look clean and the image is distinct.
- Dry: let it air dry. Blues deepen as the print dries; if curling happens, press under heavy books with clean scrap paper on top.
Creative project ideas for different ages
- Nature scavenger series: make a “leaf library” with labeled prints (oak, fern, clover) for a science + art crossover.
- Storytelling set: create character silhouettes with paper cutouts and assemble a mini “blue” comic strip.
- Pattern play: repeat shells, buttons, or lace motifs to explore rhythm, symmetry, and negative space.
- Seasonal crafts: trim prints into greeting cards, bookmarks, and gift tags.
- Classroom-friendly comparisons: groups can test how cloud cover, time of day, and object thickness change results.
Tips for sharper details and richer blues
Safety and sunlight basics for kids
- Choose acrylic over glass: glass can break; acrylic is safer and lighter (adult help recommended either way).
- Practice sun safety: take shade breaks, use protective clothing, and apply sunscreen as appropriate (see CDC: Sun Safety).
- Store paper correctly: keep unused sheets in a dark envelope or drawer to prevent unintended exposure.
- Clean up well: rinse prints in a dedicated tray/sink area and wash hands after crafting.
A simple way to gift or plan an activity day
Extra add-ons (in stock)
- New Balance 550 Sneakers for comfortable outdoor crafting sessions when kids are moving between sun and rinse stations.
- Elegant Structured Crocodile Pattern Leather Shoulder Bag – Soft Texture as a handy carry-all for boards, acrylic sheets, and finished prints (especially for workshops or camp days).
- Cute Apple House Kitten Plush – Soft Detachable Cat Plush Toy as a cozy “craft-time buddy” or a fun reward after the last print dries.
FAQ
How long should cyanotype paper stay in the sun?
Exposure time varies with UV strength (bright midday sun is fastest), cloud cover, and how thick your objects are. Start with a small test strip and adjust until you get crisp highlights and deep blues.
Can cyanotype prints be done indoors?
They need strong UV light, so direct sunlight is the easiest option. Indoor exposure can work with a UV lamp and close supervision, but set up papers away from windows so they don’t pre-expose.
What objects work best for crisp sun-print silhouettes?
Flat, thin items like fern fronds, grasses, lace, stencils, and paper cutouts usually give the sharpest detail. Pressing everything tightly with acrylic helps prevent fuzzy edges.









Leave a comment